By giving your eyes more depth, color, and dimension, eyeshadow may significantly improve your appearance. Knowing how to apply eyeshadow correctly may make all the difference, whether your goal is a strong nighttime look or a natural daytime one.
With the aid of this detailed tutorial & expert advice, you will become an expert at applying eyeshadow & effortlessly create stunning eye makeup looks.
Essential Tools and Products for Eyeshadow Application
Before we dive into the tutorial, gather the essentials you’ll need for flawless eyeshadow application:
- Primer: To make your eyeshadow last longer and prevent creasing.
- Eyeshadow Palette: Choose a palette with a variety of colors to create versatile looks.
- Brushes: A flat shader brush, blending brush, crease brush, and a smudger brush are key.
- Eyeliner: Optional, but useful for defining the lash line.
- Mascara: Completes the eye look with fuller lashes.
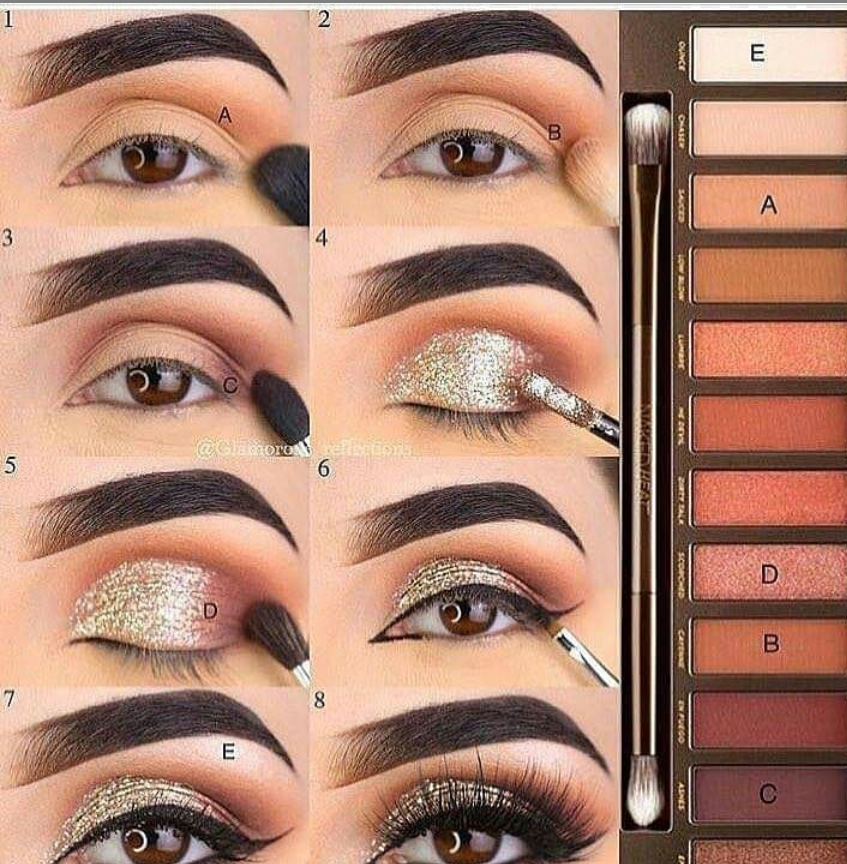
Step-By-Step guide to apply eyeshadow
Step 1: Prep Your Eyelids
The first step in creating a long-lasting, crease-free eyeshadow look is using a primer. By serving as a basis, the primer makes colors look more vivid and hold their color throughout the day.
- Apply a small amount of primer onto your eyelids.
- Blend evenly with your finger or a small brush, covering the entire lid up to the brow bone.
- Wait a few seconds to let the primer set.
Pro Tip: If you don’t have primer, a bit of concealer works as a good substitute to even out the color of your lids.
Step 2: Choose Your Eyeshadow Shades
A typical eyeshadow look includes three shades: a transition shade, lid shade, and darker shade for depth.

- Transition shade: Neutral tone, slightly darker than your skin.
- Lid shade: The main color, which can be bold or subtle depending on your desired look.
- Darker shade: Adds dimension and is applied in the outer corner or crease.
Example: For a classic natural look, opt for beige or light brown for the transition, a soft pink or champagne for the lid, and a dark brown or plum for the outer corner.
Step 3: Apply the Transition Shade
The transition shade helps blend other colors smoothly, creating a more polished look.
- Dip a blending brush into your chosen transition shade.
- Apply it to the crease of your eyelid, using a windshield-wiper motion to blend back and forth.
- Blend until there are no harsh lines.
Pro Tip: Keep a clean blending brush on hand to soften edges as you go, ensuring seamless transitions.
Step 4: Apply the Lid Shade
The lid shade is usually the main color and can be a matte, shimmer, or metallic finish depending on your look.
- Use a flat shader brush to pack the lid shade onto your eyelid, starting from the center and working toward the inner corner.
- Pat the color onto the lid, avoiding sweeping motions to keep the color vibrant.
For extra shine, use a wet brush to apply metallic or shimmer shades for a more intense effect.
Step 5: Define the Crease with a Darker Shade
Adding a darker shade to your crease and outer corner creates depth and drama, enhancing the shape of your eyes.
- Pick up a small amount of darker shade with a crease brush.
- Apply it to the outer corner of your eye, using circular motions to blend it inward.
- Blend lightly along the crease, ensuring a seamless transition between colors.
Pro Tip: Start with a small amount of product and build up gradually. It’s easier to add more color than to remove excess.
Step 6: Highlight the Inner Corner and Brow Bone
A touch of highlighter or a light shimmer shade can brighten the eyes and make them appear larger.
- Using a small brush, apply a tiny amount of a light, shimmery shade to the inner corner of your eye.
- Blend a bit of the same shade under the brow bone to add lift.
This step adds brightness and draws attention to the eyes, perfect for both natural and glam looks.
Step 7: Apply Eyeliner (Optional)
For added definition, apply eyeliner to your upper lash line. A fine line creates a subtle look, while a thicker line can add drama.
- Use a gel, liquid, or pencil liner based on your preference.
- For a smoky effect, smudge the eyeliner slightly using a smudger brush or a small eyeshadow brush.
Pro Tip: Brown eyeliner creates a softer look, while black adds boldness.
Step 8: Finish with Mascara
Mascara is the finishing touch that completes any eye look, adding volume and length to your lashes.
- Curl your lashes with an eyelash curler for extra lift.
- Apply one or two coats of mascara to both your upper and lower lashes.
Pro Tip: Wiggle the mascara wand at the base of your lashes to enhance volume.
Quick Summary: Eyeshadow Application in Simple Steps
- Prep the lids with primer for a smooth base.
- Apply transition shade to the crease.
- Add the lid shade as the main color.
- Define the outer corner with a darker shade.
- Highlight inner corner and brow bone for brightness.
- (Optional) Apply eyeliner for definition.
- Finish with mascara for fuller lashes.
Final Thoughts
With the correct skills and a little experience, you can apply eyeshadow like a pro. You may improve the contour of your eyes and extend the wear of your eyeshadow by following these techniques.
Try a variety of hues, styles, and finishes to choose which one best fits your appearance. You’ll become an expert at applying eyeshadow and produce gorgeous looks for any occasion with these pointers.


